Pages

Friday, June 28, 2013

Nail Update and FOTD

I haven't posted a nail update in a long time so here they are! My nails, naked(;

AND THE DAYVIEW of my left hand. My nails are terrible short and ugly compared to the right but I'm working on them(:

And here is my face of the day for yesterday(:

How I achieved this look:

1. Apply moisturizer, I use Aveeno Daily Moisturizing Lotion
2. Use your favorite concealer or cream foundation to cover any imperfections
3. Apply prefered face powder all over with a large fluffy face brush
4. Use a slanted bluush brush to apply desired blush, I used NYC Sutton Place Peach
5. Apply a lip balm
6. Apply a matte eyeshadow close to your skin tone all over the lid.
7. Use a blending brush and blend a little brown into the outer corner
8. Line eyes with gel liner on top lashline. Wing out liner slightly for a natural wing, no more then about 2 centimeters.
9. Apply 2 coats of 2 different mascaras on top and bottom lashes(:
10. Apply babylips in pink punch AND take selfies<3

Disclaimer: Try to ignore my hair, I do my makeup first(:

Monday, June 24, 2013

Favorite Nail Blog(s)

Today i want to share with you my favorite nail blog of all time!

KELSIES NAIL FILES @ http://www.kelsiesnailfiles.com/

I want to post some of my favorites of her work(;


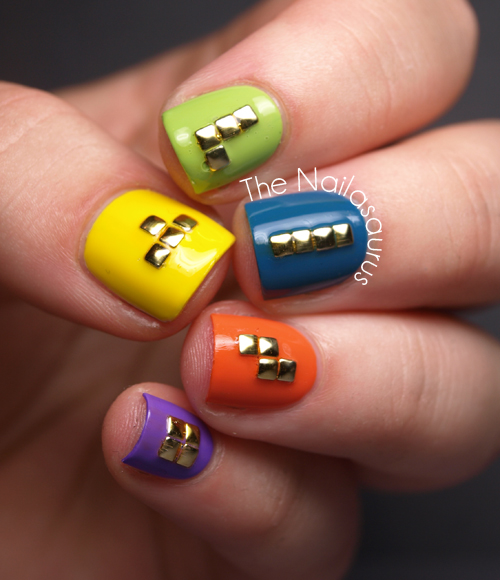
And Kelsie's blog was actually inspired by my second favorite blog: The Nailasaurus @ http://www.thenailasaurus.com/

Some of my favorite work by Sammi:
Studded Tetris Nail Art by The Nailasaurus

Thursday, June 20, 2013

5 Minute Mani

I know a lot of you don't really have a lot of time to take care of your nails. I do my manicure in 5 minutes or under everyday so I decided to share my procedure(: It only consists of 3 simple things, $10 or under.

So what you'll need:

- Vaseline (or cuticle cream)
- Buffer
- Strengthener/Growth Polish

Step 1: Remove previous polish. This takes me about 30 seconds.
Step 2: Wash hands quickly to remove traces of acetone. A minute at the most.
Step 3: Buff nails. 30 seconds
Step 4: Massage cuticle cream or Vaseline (prefered) into nails. 1 minute.
Step 5: Let cream sit on nails and cuticles for atleast 30 seconds.
Step 6: Remove access oils. 30 seconds.
Step 7: Apply a strengthener or special growth polish. 30 seconds.

Total: 4 minutes and 30 seconds.
Disclaimer: Time may vary(;

Tuesday, June 18, 2013

Purple and Yellow Nail Art

I've been going through my posts and it seems like most everything I do is about nails. I promised more hair, makeup, and skin related posts. In order to make room for them I'm cutting back on nail posts. I'll still be doing nail art, it doesn't mean I'm going to stop doing my nails. I'll just combine them into 1 post.

Lastnight, I did two different designs. (Yes, I did my nails twice in one day). First I painted my nails 3 thin coats of this bright yellow polish (noname). Next, I used a purple striper to create checker, and random lines. I didn't add a topcoat to either design.

For the second design I painted my nails 2 coats of Wet N Wild White Creme. Then I used a bobby pin (cheap version of dotting tool) to creat yellow dots in a curved shape. I repeated this with a blue polish and a neon green polish.

Monday, June 17, 2013

Cupcake Nails Part 2, EOTD, and more...

Long time, no post. Sorry, I've been pretty busy lately but I promise I'll try to post more frequently.

Anyway, I tried cupcake nails again, using a different technique. And this time they have a glitter background. (:

Also, I did my everyday makeup a little different one day and I'm really liking it so far so I might continue doing it this way.

Plus, I took quite a few pictures of myself so I thought I might as well post them too. Selfies<3

I also attempted braided nails for the first time, and I did okay but I'm not really happy with the results. I followed a tutorial that made it look sooo easy, but its pretty hard I think.

Thursday, June 13, 2013

Never before seen nail art

Today, I'm gonna post some of the nail art I've never posted (either because I wasn't happy with it or forgot or something). I'll definetely do more of these posts if it gets a lot of views. (;

*black with placed glitter
*mint blue with glitter tips
*purple pink silver glitter colorblock

Monday, June 10, 2013

Ombre and Border Nails

Off topic: I got contacts today(:
On topic: New Nail Posts! Yay,

This week I've done 2 looks out of my comfort zone. Ombre and Border. After seeing a simple tutorial on border nails, I felt relieved. And I did these ombre nails with a sponge!

Off topic again: Pretty Little Liars is back tomorrow<3, plus my bowling and rollerskating feildtrip is tomorrow also.

Sunday, June 9, 2013

EOTD: Mount Rainier

Yesterday, I went to Mount Rainier for the first time. It was amazing. Everything there is so beautiful and pure. It was a very long drive though. About 4 hours, there and back. I had a lot of time in the car to take pictures but not blog because there was no service. So that's what I'll do now! (=

I actually did my makeup in the car, believe it or not. First, I applied a gold cream shadow as a base. Then, I used a brown-er eyeshadow over the gold and applied my Loreal Infallible Gel Liner. Lastly, I applied a coat of black mascara. (:

Plus I made cookies !

COUNTDOWN TO FORMAL: 3
COUNTDOWN TO LAST DAY OF SCHOOL: 5
COUNTDOWN TO FEILD TRIP: 2
COUNTDOWN TO AVID CEREMONY: 3

Thursday, June 6, 2013

First impressions: Babylips +

I just tried Maybelline Babylips for the first time, even though it came out months ago. I've seen overall mixed reviews and decided its something I need to try for myself.

I bought mine in the shade Pink Punch.

Packaging first. Nothing special about it, but also no complaints. Its just a simple round tube, like other lip balms. I love the bright colors and font!

As soon as I opened it I applied it to my bottom lip only to see how tinted it was. From a scale of no tint to Lady Gaga, i'd say a 2 or 3. I also swatched it on my hand and its about the same. The other color selection looked really nice too!

On the back of the packaging some of the claims made are "82% VISIBLY LESS DRY, 94% LESS ROUGH LIPS, 77% MORE SUPPLE, 77% BETTER LOOKING LIPS". I've only applied this product 2 or 3 times so I can't do a complete review. But, from 2 or 3 applications my lips do look less dry, feel less rough, more supple, and look better so I believe those claims were very reasonable and true.

So far so good with Babylips.

Next, Vaseline Lip Therapy Original.

The packaging is so cute! Its like a mini tub of vaseline.

I applied very little to my lips and waited a few seconds for it to sink in. It actually absorbed into my lips very quickly. The product is very soft, so be careful not to push your finger in too hard or you'll have a big dent. This is definetely something I'll be adding to my everyday beauty bag!

Vaseline's claims are "instantly softens and soothes dry lips" TRUE x100, "locks in moisture so lips feel better over time" TRUE x100. Both claims are very reasonable, and I feel like they could've said something about the appearance of lips because my lips looked so much healthier! (:

Disclaimer: Sorry no lip swatches, bad lighting:(

Tuesday, June 4, 2013

Worst Nail Art 2013

I've been going through my pictures a lot lately and I've noticed I have over 100 pictures of my nail art. Some of them, pretty bad. So I decided to show you all my worst nail art of 2013, so far(;

Watermarble and using striping tape are my weaknesses :/